没事多喝水

技术笔记&记录生活点滴

  • 首页
  • 读书
  • 观影
  • 笔记
  • 读书笔记
  • Android学习
  • 生活
  • 吹口琴
  • 爱咖啡
  • IT技术-文档
  • 日常桌面
  • 数据库
  • CI/CD运维
  • Android开发
  • 小程序&微网页
  • Web开发
  • 产品
  • 教学
  • 安卓
  • 关于
  • 标签
  • 搜索

git规范例子

发表于 2022-04-03 | 分类于 IT技术/Web开发

git的一个工作流规范

基本状态示意图

工作流示意图

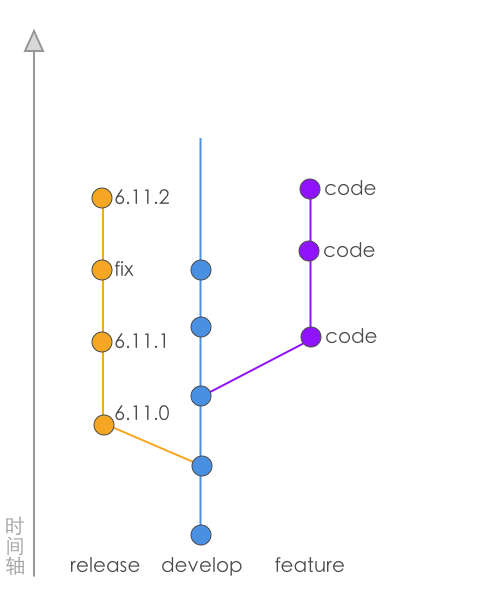
正常的工作流里面,我们会把分支分为 release,develop 和开发人员的提交分支。

release 分支的含义是相对稳定,发布在正式环境上面的代码。这个分支是一个短命分支,里面的更改和优化不会再回溯到 develop 分支中去。bug 的修复会发布一个小版本;而一个功能发布会重新定义 release 分支,以前的就舍弃掉了。

develop 分支的含义是一个相对不稳定,可能再开发的阶段的代码。这里面的代码一般情况下是下一个阶段会发布的代码,通常会跑在内测环境上面。

提交信息使用中文

团队成员里面大概不会有不认识中文的同学,全体使用中文的话,能够提高可读性。

如果本来英文就不好,然后写出了蹩脚的信息,再让另一个英文不好的同学去阅读,这时候基本很难看明白。

关于使用英文的好处,因为团队里面国外开发人员的情况较少,所以基本不太需要英文来交流;当然,英文还有另外一个好处,那就是在命令行使用的时候,不需要进行输入法切换。

分支命名规则

  • feature/xxx-xxx (命名一个功能分支)
  • issue/xxx-xxx (命名一个 develop 线上的修复)
  • hotfix/xxx-xxx (命名一个 release 线上的修复)
  • refactor/xxx-xxx (命名一个优化分支)

基本开发流程

  1. 从 develop 线上切一个功能分支出来。

  2. 到 gitlab 上面提交 MergeRequest,并且添加 [WIP] 关键字到标题中,标明这处于开发中的状态。

  3. 持续进行开发,并且经常 rebease 到最新的 develop。

  4. 找设计师进行面对面的 UI Review,和一些细节调整。

  5. 审核完毕之后,整理合并成一个符合规范的 Commit。

  6. 到 gitlab 上面修改分支状态,去掉 [WIP] 关键字,并且通知 Reviewer。如果审核通过,那么就合并到主分支,并且删除远程分支。

Commit 模板

1
2
3
4
5
TYPE(功能标题):功能简述

这是是描述的第一段信息,用举例说明提交一个合法的提交信息是怎么样的。

这是是描述的第二段信息,用来说明这次提交的一些东西。

HOTFIX 修复

定义一个 hotfix 的修复是需要条件的,不是所有的线上问题都应该进行 hotfix。如果把一个BUG的等级分为一般,重要,和紧急三个等级的话,那么只有紧急状态才会进行 hotfix。而其他状态都应该提交一个 issue,随着下次版本升级而修复。而一旦一个 hotfix 提交,并且合并,那么需要即刻上线或者当天上线。

HOTFIX Commit 模板

1
2
3
4
5
6
7
8
9
HOTFIX(影响文件):功能简述

BUG原因:

这是是描述这次BUG产生的原因,具体可以到谁哪个Commit造成的。

修复方式:

这里是描述这次修复的方式,可能有什么黑科技需要注意的。

ISSUE 修复

一个BUG如果不是用 hotfix 那么就应该用 issue 进行修复。

而一个 issue 修复可能是因为以前的代码造成的,那么括号里面应该写清楚本次修复影响的文件;如果新的功能造成的,那么括号中描述就应该写上与那个功能相关的功能标题。

ISSUE Commit 模板

1
2
3
4
5
6
7
8
9
ISSUE(影响文件/功能标题):功能简述

BUG原因:

这是是描述这次BUG产生的原因,具体可以到谁哪个Commit造成的。

修复方式:

这里是描述这次修复的方式,可能有什么黑科技需要注意的。

分支线类型列表

FEATURE: 功能开发

ISSUE: BUG 修复

HOTFIX:紧急 BUG 修复

REFACTOR:优化和重构

DOC: 更改文档

CHORE:其它更改, 比如更新工具

nginx配置文件 root alias的区别

发表于 2022-03-15 | 分类于 IT技术/Web开发

root和alias是系统文件路径的设置
root用来设置根目录,alias用来重置当前文件的目录

alias

1
2
3
location /img/ {
alias /var/www/image/;
}

访问/img/目录里面的文件时,nginx会自动去/var/www/image/目录找文件

root

1
2
3
location /img/ {
root /var/www/image;
}

访问/img/目录下的文件时,nginx会去/var/www/image/img/目录下找文件

关于$document_root

$document_root 是指当前面{}组中的root选项对应的值变量
如果当前{}中没有,就会使用server{}中的root选项

案例

1
2
3
4
5
6
7
8
9
10
11
12
13
14
15
16
17
18
19
location ~ ^/test/.+\.php$ {
alias /var/www/html/test/;

# 做了一个重写方式,将php后缀名隐藏
# 比如 /test/1.php 重写成了 /test/1

rewrite /test/(.*\.php?) /$1 break;
fastcgi_index index.php;
fastcgi_pass 127.0.0.1:9000;

# 指定php-fpm读取的文件路径
fastcgi_param SCRIPT_FILENAME /var/www/html/test$fastcgi_script_name;
include fastcgi_params;
}

location ~ ^/test($|/.*) {
alias /var/www/html/test/$1;
index index.php index.html index.htm;
}

drone_ci脚本编写

发表于 2022-03-12 | 分类于 IT技术/运维

脚本用yml编写,每个管道用—来区分,单一管道内通过-name来设定不同的步骤,每个管道内的步骤,有when设定满足执行条件.

脚本

1
2
3
4
5
6
7
8
9
10
11
12
13
14
15
16
17
18
19
20
21
22
23
24
25
26
27
28
29
30
31
32
33
34
35
36
37
38
39
40
41
42
43
44
45
46
47
48
49
50
51
52
53
54
55
56
57
58
59
60
61
62
63
64
65
66
67
68
69
70
71
72
# build代码
kind: pipeline
type: ssh
name: 开发测试更新部署

clone:
disable: true

# 执行平台
platform:
os: linux
arch: arm

server:
host: 10.12.0.6
user: pi
password:
from_secret: passwd

# 更新代码
steps:

# 更新仓库
- name: 拉取
environment:
VARPATH: /var
REPO_URL: 10.12.0.2:3000
WORKSPACE: /workspace
PROJ_NAME: aliseochina
BRANCH: develop
GITUSR:
from_secret: git_usr
GITPASS:
from_secret: git_pass

commands:
# 初始化部分,第一次clone从仓库中
- cd $$WORKSPACE/$$PROJ_NAME
- git pull

when:
branch:
- develop

# 部署代码
- name: 部署测试站
depends_on:
- 拉取
environment:
VARPATH: /var
WORKSPACE: /workspace
PROJ_NAME: aliseochina
REMOTE_USER: ubuntu
REMOTE_HOST: 165.154.20.145
TARGET: /tmp/aliseo
EXCLUDE_FROM_FILE: 'exclude-file.txt'
commands:
- cd $$WORKSPACE/$$PROJ_NAME
# 同步代码
- rsync -ave -t -r -z --rsh=ssh --stats * --exclude-from=$$EXCLUDE_FROM_FILE $$REMOTE_USER@$$REMOTE_HOST:$$TARGET

when:
branch:
- develop

# 触发条件
trigger:
branch:
- develop
event:
- pull_request
- push

secret秘钥的添加

  • 通过网站添加

  • 通过命令添加

    • 安装drone命令
      1
      2
      3
      4
      5
      6
      7
         wget https://github.com/harness/drone-cli/releases/download/v1.5.0/drone_linux_arm.tar.gz
      tar zxvf drone_linux_arm.tar.gz
      cp drone /usr/local/bin

      # 编辑bashrc添加
      export DRONE_SERVER=http://ip:9090
      export DRONE_TOKEN=秘钥
    • 针对某个仓库添加秘钥
      1
      2
      3
      4
      drone secret add \
      --repository 仓库名称 \
      --name rsync_key \
      --data @./id_rsa

树莓派3 docker build alpine问题汇总

发表于 2022-03-12

以下引用自:https://blog.51cto.com/laok8/2618697,提供的方法

fatal: unable to access error:0D0D90AD:asn1 encoding routines:ASN1_TIME_adj:error getting time

在树莓派3B+(cpu 是 armv7 架构) 上面跑的 Docker。

问题是镜像  alpine 3.13 版本引起的(3.12 没问题).

1
2
3
4
5
6
7
>docker container run --rm -it alpine:3.13 sh
>/ # ping 8.8.8.8
>PING 8.8.8.8 (8.8.8.8): 56 data bytes
>ping: clock_gettime(MONOTONIC) failed
>/ # nslookup www.baidu.com
>nslookup: clock_gettime(MONOTONIC) failed

1
2
3
4
5
6
7
8
9
10
11
12
13
>docker container run --rm -it --privileged alpine:3.13 sh
>/ # nslookup www.baidu.com
>Server: 8.8.8.8
>Address: 8.8.8.8:53

>Non-authoritative answer:
>Name: www.baidu.com
>Address: 220.181.38.148

>Non-authoritative answer:
>Name: www.baidu.com
>Address: 2a00:1450:4005:80b::2003

最根本的原因是 Docker 自 1.10 版本开始加入的安全特性( –security-opt seccomp=/path/to/seccomp/profile.json),这里还不确定是 alpine 镜像里的哪个 系统调用 被阻拦了(怀疑是 clock_settime )

Secure computing mode (seccomp) is a Linux kernel feature. You can use it to restrict the actions available within the container. The seccomp() system call operates on the seccomp state of the calling process. You can use this feature to restrict your application’s access.
This feature is available only if Docker has been built with seccomp and the kernel is configured with CONFIG_SECCOMP enabled. To check if your kernel supports seccomp:

提供的解决方案:

  • 改动 Dockerfile 里的版本,指定拉取 alpine:3.12 版本,然后再 build 一个镜像、容器.
  • 直接关闭 seccomp 配置
  • 确定是哪个系统调用函数引起的,然后使用 docker run –cap-add=SYS_PTRACE 明确添加
1
docker run -it --rm --security-opt seccomp=unconfined alpine:3.13 ping www.google.de

RPC failed; HTTP 413 curl 22 The requested URL returned error: 413 Request Entity Too Large问题

发表于 2022-03-11 | 分类于 IT技术/Web开发/

向远程仓库推送时:RPC failed; HTTP 413 curl 22 The requested URL returned error: 413 Request Entity Too Large错误!

解决办法是:

在git bash中执行:git config http.postBuffer 524288000

成功后,再次提交

postBuffer改为最大50M

4种基本布局

发表于 2022-02-28 | 分类于 笔记/安卓/

布局与控件的关系

upload successful

线性布局

LinearLayout 作线性布局

此布局会将它所包含的控件在线性方向上依次排列

线性排列,向2个方向排列。

android:orientation 属性指定了排列方向

vertical纵向排列

horizontal水平方向上排列

界面XML

在LinearLayout中添加了3个Button,每个Button的长和宽都是wrap_content ,并指定了排列方向是vertical

1
2
3
4
5
6
7
8
9
10
11
12
13
14
15
16
17
18
19
20
21
22
23
24
<LinearLayout xmlns:android="http://schemas.android.com/apk/res/android"
android:orientation="vertical"
android:layout_width="match_parent"
android:layout_height="match_parent">

<Button
android:id="@+id/button1"
android:layout_width="wrap_content"
android:layout_height="wrap_content"
android:text="Button 1" />

<Button
android:id="@+id/button2"
android:layout_width="wrap_content"
android:layout_height="wrap_content"
android:text="Button 2" />

<Button
android:id="@+id/button3"
android:layout_width="wrap_content"
android:layout_height="wrap_content"
android:text="Button 3" />

</LinearLayout>

修改一下LinearLayout的排列方向,改为水平排列

注意

LinearLayout的排列方向是horizontal,内部的控件就绝对不能将宽度指定为match_parent 。因为单独一个控件就会将整个水平方向占满,而其他控件就没有可放置的位置了。同理,如果LinearLayout的排列方向是vertical,内部的控件就不能将高度指定为match_parent

1
2
3
4
5
6
7
8
9
10
11
12
13
14
15
16
17
18
19
20
21
22
23
24
25
26
27
<LinearLayout xmlns:android="http://schemas.android.com/apk/res/android"
android:orientation="horizontal"
android:layout_width="match_parent"
android:layout_height="match_parent">

<Button
android:id="@+id/button1"
android:layout_width="wrap_content"
android:layout_height="wrap_content"
android:layout_gravity="top"
android:text="Button 1" />

<Button
android:id="@+id/button2"
android:layout_width="wrap_content"
android:layout_height="wrap_content"
android:layout_gravity="center_vertical"
android:text="Button 2" />

<Button
android:id="@+id/button3"
android:layout_width="wrap_content"
android:layout_height="wrap_content"
android:layout_gravity="bottom"
android:text="Button 3" />

</LinearLayout>

指定垂直方向上的排列方向,将第一个Button的对齐方式指定为top,第二个Button的对齐方式指定为center_vertical,第三个Button的对齐方式指定为bottom

android:layout_weight

允许使用比例的方式来指定控件的大小

界面XML

编写一个消息发送界面,需要一个文本编辑框和一个发送按钮

1
2
3
4
5
6
7
8
9
10
11
12
13
14
15
16
17
18
19
20
21
22
<LinearLayout xmlns:android="http://schemas.android.com/apk/res/android"
android:orientation="horizontal"
android:layout_width="match_parent"
android:layout_height="match_parent">

<EditText
android:id="@+id/input_message"
android:layout_width="0dp"
android:layout_height="wrap_content"
android:layout_weight="1"
android:hint="Type something"
/>

<Button
android:id="@+id/send"
android:layout_width="0dp"
android:layout_height="wrap_content"
android:layout_weight="1"
android:text="Send"
/>

</LinearLayout>

注意

将EditText和Button的宽度都指定成了0dp,由于使用了android:layout_weight 属性,此时控件的宽度就不应该再由android:layout_width 来决定

在EditText和Button里都将android:layout_weight 属性的值指定为1,这表示EditText和Button将在水平方向平分宽度

为什么将android:layout_weight 属性的值同时指定为1就会平分屏幕宽度?

系统会先把LinearLayout下所有控件指定的layout_weight 值相加,得到一个总值,然后每个控件所占大小的比例就是用该控件的layout_weight 值除以刚才算出的总值。

另一个效果

1
2
3
4
5
6
7
8
9
10
11
12
13
14
15
16
17
18
19
20
21
<LinearLayout xmlns:android="http://schemas.android.com/apk/res/android"
android:orientation="horizontal"
android:layout_width="match_parent"
android:layout_height="match_parent">

<EditText
android:id="@+id/input_message"
android:layout_width="0dp"
android:layout_height="wrap_content"
android:layout_weight="1"
android:hint="Type something"
/>

<Button
android:id="@+id/send"
android:layout_width="wrap_content"
android:layout_height="wrap_content"
android:text="Send"
/>

</LinearLayout>

指定了EditText的android:layout_weight 属性,并将Button的宽度改回wrap_content 。这表示Button的宽度仍然按照wrap_content 来计算,而EditText则会占满屏幕所有的剩余空间

相对布局

通过相对定位的方式让控件出现在布局的任何位置

1
2
3
4
5
6
7
8
9
10
11
12
13
14
15
16
17
18
19
20
21
22
23
24
25
26
27
28
29
30
31
32
33
34
35
36
37
38
39
40
41
42
43
<RelativeLayout xmlns:android="http://schemas.android.com/apk/res/android"
android:layout_width="match_parent"
android:layout_height="match_parent">

<Button
android:id="@+id/button1"
android:layout_width="wrap_content"
android:layout_height="wrap_content"
android:layout_alignParentLeft="true"
android:layout_alignParentTop="true"
android:text="Button 1" />

<Button
android:id="@+id/button2"
android:layout_width="wrap_content"
android:layout_height="wrap_content"
android:layout_alignParentRight="true"
android:layout_alignParentTop="true"
android:text="Button 2" />

<Button
android:id="@+id/button3"
android:layout_width="wrap_content"
android:layout_height="wrap_content"
android:layout_centerInParent="true"
android:text="Button 3" />
<Button
android:id="@+id/button4"
android:layout_width="wrap_content"
android:layout_height="wrap_content"
android:layout_alignParentBottom="true"
android:layout_alignParentLeft="true"
android:text="Button 4" />

<Button
android:id="@+id/button5"
android:layout_width="wrap_content"
android:layout_height="wrap_content"
android:layout_alignParentBottom="true"
android:layout_alignParentRight="true"
android:text="Button 5" />

</RelativeLayout>

Button 1和父布局的左上角对齐,Button 2和父布局的右上角对齐,Button 3居中显示,Button 4和父布局的左下角对齐,Button 5和父布局的右下角对齐

帧布局

FrameLayout又称作帧布局,所有的控件都会默认摆放在布局的左上角

1
2
3
4
5
6
7
8
9
10
11
12
13
14
15
16
17
18
19
<FrameLayout xmlns:android="http://schemas.android.com/apk/res/android"
android:layout_width="match_parent"
android:layout_height="match_parent">

<TextView
android:id="@+id/text_view"
android:layout_width="wrap_content"
android:layout_height="wrap_content"
android:text="This is TextView"
/>

<ImageView
android:id="@+id/image_view"
android:layout_width="wrap_content"
android:layout_height="wrap_content"
android:src="@mipmap/ic_launcher"
/>

</FrameLayout>

FrameLayout中只是放置了一个TextView和一个ImageView。这里ImageView直接使用了@mipmap 来访问ic_launcher这张图

可以看到,文字和图片都是位于布局的左上角。由于ImageView是在TextView之后添加的,因此图片压在了文字的上面

还可以使用layout_gravity 属性来指定控件在布局中的对齐方式

1
2
3
4
5
6
7
8
9
10
11
12
13
14
15
16
17
18
19
20
21
<FrameLayout xmlns:android="http://schemas.android.com/apk/res/android"
android:layout_width="match_parent"
android:layout_height="match_parent">

<TextView
android:id="@+id/text_view"
android:layout_width="wrap_content"
android:layout_height="wrap_content"
android:layout_gravity="left"
android:text="This is TextView"
/>

<ImageView
android:id="@+id/button"
android:layout_width="wrap_content"
android:layout_height="wrap_content"
android:layout_gravity="right"
android:src="@mipmap/ic_launcher"
/>

</FrameLayout>

百分比布局

app/build.gradle文件,在dependencies 闭包中添加如下内容:

1
2
3
4
5
6
dependencies {
compile fileTree(dir: 'libs', include: ['*.jar'])
compile 'com.android.support:appcompat-v7:24.2.1'
compile 'com.android.support:percent:24.2.1'
testCompile 'junit:junit:4.12'
}
1
2
3
4
5
6
7
8
9
10
11
12
13
14
15
16
17
18
19
20
21
22
23
24
25
26
27
28
29
30
31
32
33
34
35
36
37
38
39
<android.support.percent.PercentFrameLayout
xmlns:android="http://schemas.android.com/apk/res/android"
xmlns:app="http://schemas.android.com/apk/res-auto"
android:layout_width="match_parent"
android:layout_height="match_parent">

<Button
android:id="@+id/button1"
android:text="Button 1"
android:layout_gravity="left|top"
app:layout_widthPercent="50%"
app:layout_heightPercent="50%"
/>

<Button
android:id="@+id/button2"
android:text="Button 2"
android:layout_gravity="right|top"
app:layout_widthPercent="50%"
app:layout_heightPercent="50%"
/>

<Button
android:id="@+id/button3"
android:text="Button 3"
android:layout_gravity="left|bottom"
app:layout_widthPercent="50%"
app:layout_heightPercent="50%"
/>

<Button
android:id="@+id/button4"
android:text="Button 4"
android:layout_gravity="right|bottom"
app:layout_widthPercent="50%"
app:layout_heightPercent="50%"
/>

</android.support.percent.PercentFrameLayout>

最外层使用了PercentFrameLayout,由于百分比布局并不是内置在系统SDK当中的,所以需要把完整的包路径写出来。然后还必须定义一个app的命名空间,这样才能使用百分比布局的自定义属性。

在PercentFrameLayout中我们定义了4个按钮,使用app:layout_widthPercent 属性将各按钮的宽度指定为布局的50%,使用app:layout_heightPercent 属性将各按钮的高度指定为布局的50%。这里之所以能使用app前缀的属性就是因为刚才定义了app的命名空间,当然我们一直能使用android前缀的属性也是同样的道理。

PercentFrameLayout还是会继承FrameLayout的特性,即所有的控件默认都是摆放在布局的左上角。那么为了让这4个按钮不会重叠,这里还是借助了layout_gravity 来分别将这4个按钮放置在布局的左上、右上、左下、右下4个位置。

常用UI控件

发表于 2022-02-28 | 分类于 笔记/安卓/

空间公用属性

android:id 给当前控件定义了一个唯一标识符

android:layout_width、android:layout_height 指定了控件的宽度和高度

宽度和高度可选属性

MATCH_PARENT 、FILL_PARENT 、 WRAP_CONTENT

FILL_PARENT在Android2.2后,名称改为: FILL_PARENT改名为MATCH_PARENT

MATCH_PARENT 表示让当前控件的大小和父布局的大小一样,也就是由父布局来决定当前控件的大小

WRAP_CONTENT 表示让当前控件的大小能够刚好包含住里面的内容,也就是由控件内容决定当前控件的大小

对齐方式

android:gravity 指定文字的对齐方式

可选值有 top 、bottom 、left 、right 、center

center 表示在垂直和水平方向都居中对齐

文字大小

android:textSize 属性指定文字的大小

android:textColor 属性指定文字的颜色

分辨率

低(120dpi)、中(160dpi)、高(240dpi)、超高(320dpi)

屏幕尺寸、分辨率、像素密度三者关系

upload successful

upload successful

大小单位

PX: 像素单位,常用尺寸单位,常用于图片设计、网页设计等
DP: 单位英寸的像素点数量

DP到PX的转换系数分别是0.75、1、1.5、2,这个系数乘dp长度就是像素数。假如我的手机像素密度是240dpi,现在屏幕上有一个长度为80dp 的图片,那么显示的像素长度为80x1.5=120px。

推荐使用12sp、14sp、18sp、22sp作为字体设置的大小,不推荐使用奇数和小数,容易造成精度的丢失问题;小于12sp的字体会太小导致用户看不清

TextView

1
2
3
4
5
6
7
8
9
10
11
12
13
14
15
<LinearLayout xmlns:android="http://schemas.android.com/apk/res/android"
android:orientation="vertical"
android:layout_width="match_parent"
android:layout_height="match_parent">

<TextView
android:id="@+id/text_view"
android:layout_width="match_parent"
android:layout_height="wrap_content"
android:gravity="center"
android:textSize="24sp"
android:textColor="#00ff00"
android:text="This is TextView" />

</LinearLayout>

Button

界面XML

1
2
3
4
5
6
7
8
9
10
11
12
13
14
<LinearLayout xmlns:android="http://schemas.android.com/apk/res/android"
android:orientation="vertical"
android:layout_width="match_parent"
android:layout_height="match_parent">

...

<Button
android:id="@+id/button"
android:layout_width="match_parent"
android:layout_height="wrap_content"
android:text="Button" />

</LinearLayout>

android:textAllCaps 所有英文字母大写

执行代码

匿名监听方式

在MainActivity中为Button的点击事件注册一个监听器

1
2
3
4
5
6
7
8
9
10
11
12
13
14
15
16
17
public class MainActivity extends AppCompatActivity {

@Override
protected void onCreate(Bundle savedInstanceState) {
super.onCreate(savedInstanceState);
setContentView(R.layout.activity_main);
Button button = (Button) findViewById(R.id.button);

// 基于id为button的按钮的点击事件
button.setOnClickListener(new View.OnClickListener() {
@Override
public void onClick(View v) {
// 在此处添加逻辑
}
});
}
}
接口方式
1
2
3
4
5
6
7
8
9
10
11
12
13
14
15
16
17
18
19
20
21
22
public class MainActivity extends AppCompatActivity implements View.OnClickListener {

@Override
protected void onCreate(Bundle savedInstanceState) {
super.onCreate(savedInstanceState);
setContentView(R.layout.activity_main);
Button button = (Button) findViewById(R.id.button);
button.setOnClickListener(this);
}

// 在点击事件中寻找id为button的按钮
@Override
public void onClick(View v) {
switch (v.getId()) {
case R.id.button:
// 在此处添加逻辑
break;
default:
break;
}
}
}

EditText

允许用户在控件里输入和编辑内容,并可以在程序中对这些内容进行处理

界面XML

1
2
3
4
5
6
7
8
9
10
11
12
13
14
<LinearLayout xmlns:android="http://schemas.android.com/apk/res/android"
android:orientation="vertical"
android:layout_width="match_parent"
android:layout_height="match_parent">

...

<EditText
android:id="@+id/edit_text"
android:layout_width="match_parent"
android:layout_height="wrap_content"
/>

</LinearLayout>

android:hint 指定了一段提示性的文本

android:maxLines 指定文本框的最大显示几行

执行代码

1
2
3
4
5
6
7
8
9
10
11
12
13
14
15
16
17
18
19
20
21
22
23
24
25
26
27
28
29
30
31
32
33
34
35
public class MainActivity extends AppCompatActivity implements View.OnClickListener {

private EditText editText;

@Override
protected void onCreate(Bundle savedInstanceState) {
super.onCreate(savedInstanceState);
setContentView(R.layout.activity_main);
Button button = (Button) findViewById(R.id.button);

// 获取文本框
editText = (EditText) findViewById(R.id.edit_text);

// 按钮绑定公共事件
button.setOnClickListener(this);
}

@Override
public void onClick(View v) {
switch (v.getId()) {
case R.id.button:

//读取文本框内容
String inputText = editText.getText().toString();

//显示文本框内容
Toast.makeText(MainActivity.this, inputText,
Toast.LENGTH_SHORT).show();
break;
default:
break;
}
}

}

ImageView

这个控件需要提前准备好一些图片,图片通常都是放在以“drawable”开头的目录下的,在res目录下新建一个drawable-xhdpi目录,将图片放入该目录

界面XML

1
2
3
4
5
6
7
8
9
10
11
12
13
14
15
<LinearLayout xmlns:android="http://schemas.android.com/apk/res/android"
android:orientation="vertical"
android:layout_width="match_parent"
android:layout_height="match_parent">

...

<ImageView
android:id="@+id/image_view"
android:layout_width="wrap_content"
android:layout_height="wrap_content"
android:src="@drawable/img_1 "
/>

</LinearLayout>

执行代码

1
2
3
4
5
6
7
8
9
10
11
12
13
14
15
16
17
18
19
20
21
22
23
24
25
26
27
28
29
30
31
public class MainActivity extends AppCompatActivity implements View.OnClickListener {

private EditText editText;

private ImageView imageView;

@Override
protected void onCreate(Bundle savedInstanceState) {
super.onCreate(savedInstanceState);
setContentView(R.layout.activity_main);
Button button = (Button) findViewById(R.id.button);
editText = (EditText) findViewById(R.id.edit_text);
imageView = (ImageView) findViewById(R.id.image_view);
button.setOnClickListener(this);
}

// 通过调用ImageView的setImageResource() 方法将显示的图片改成img_2

@Override
public void onClick(View v) {
switch (v.getId()) {
case R.id.button:

// 读取图片 imageView.setImageResource(R.drawable.img_2);
break;
default:
break;
}
}

}

ProgressBar

用于在界面上显示一个进度条

界面XML

android:visibility 控件的可见属性

可选值有3种:visible 、invisible 、gone

visible 表示控件是可见的,这个值是默认值

invisible 表示控件不可见,但是它仍然占据着原来的位置和大小,可以理解成控件变成透明状态

gone 则表示控件不仅不可见,而且不再占用任何屏幕空间。

android:max 进度条设置一个最大值

1
2
3
4
5
6
7
8
9
10
11
12
13
14
<LinearLayout xmlns:android="http://schemas.android.com/apk/res/android"
android:orientation="vertical"
android:layout_width="match_parent"
android:layout_height="match_parent">

...

<ProgressBar
android:id="@+id/progress_bar"
android:layout_width="match_parent"
android:layout_height="wrap_content"
/>

</LinearLayout>

执行代码

实现效果

点击一下按钮让进度条消失,再点击一下按钮让进度条出现

1
2
3
4
5
6
7
8
9
10
11
12
13
14
15
16
17
18
19
20
21
22
23
24
25
26
27
28
29
30
31
32
33
34
35
public class MainActivity extends AppCompatActivity implements View.OnClickListener {

private EditText editText;

private ImageView imageView;

private ProgressBar progressBar;

@Override
protected void onCreate(Bundle savedInstanceState) {
super.onCreate(savedInstanceState);
setContentView(R.layout.activity_main);
Button button = (Button) findViewById(R.id.button);
editText = (EditText) findViewById(R.id.edit_text);
imageView = (ImageView) findViewById(R.id.image_view);
progressBar = (ProgressBar) findViewById(R.id.progress_bar);
button.setOnClickListener(this);
}

@Override
public void onClick(View v) {
switch (v.getId()) {
// 根据判断进度条状态设定可见与不可见
case R.id.button:
if (progressBar.getVisibility() == View.GONE) {
progressBar.setVisibility(View.VISIBLE);
} else {
progressBar.setVisibility(View.GONE);
}
break;
default:
break;
}
}
}

动态地更改进度条的进度

1
2
3
4
5
6
7
8
9
10
11
12
13
14
15
16
17
18
 public class MainActivity extends AppCompatActivity implements View.OnClickListener {

...

@Override
public void onClick(View v) {
switch (v.getId()) {
case R.id.button:
int progress = progressBar.getProgress();
progress = progress + 10;
progressBar.setProgress(progress);
break;
default:
break;
}
}

}

AlertDialog

当前的界面弹出一个对话框,对话框是置顶于所有界面元素之上的,能够屏蔽掉其他控件的交互能力一般都是用于提示一些非常重要的内容或者警告信息

执行代码

1
2
3
4
5
6
7
8
9
10
11
12
13
14
15
16
17
18
19
20
21
22
23
24
25
26
27
28
29
30
31
32
33
34
35
36
37
38
public class MainActivity extends AppCompatActivity implements View.OnClickListener {

...

@Override
public void onClick(View v) {
switch (v.getId()) {
case R.id.button:
// 创建一下对话框对象
AlertDialog.Builder dialog = new AlertDialog.Builder (MainActivity.
this);
// 设置标题和按钮
dialog.setTitle("This is Dialog");
dialog.setMessage("Something important.");
dialog.setCancelable(false);

// 设置确认按钮 监听点击事件
dialog.setPositiveButton("OK", new DialogInterface.OnClickListener() {
@Override
public void onClick(DialogInterface dialog, int which) {
}
});

// 设置取消按钮 监听事件
dialog.setNegativeButton("Cancel", new DialogInterface.OnClickListener() {
@Override
public void onClick(DialogInterface dialog, int which) {
}
});

// 显示对话框
dialog.show();
break;
default:
break;
}
}
}

ProgressDialog

在对话框中显示一个进度条,一般用于表示当前操作比较耗时,让用户耐心地等待。

执行代码

1
2
3
4
5
6
7
8
9
10
11
12
13
14
15
16
17
18
19
20
21
public class MainActivity extends AppCompatActivity implements View.OnClickListener {

...

@Override
public void onClick(View v) {
switch (v.getId()) {
case R.id.button:
ProgressDialog progressDialog = new ProgressDialog
(MainActivity.this);
progressDialog.setTitle("This is ProgressDialog");
progressDialog.setMessage("Loading...");
progressDialog.setCancelable(true);
progressDialog.show();
break;
default:
break;
}
}

}

Activity 启动模式

发表于 2022-02-26 | 分类于 笔记/安卓/

4种启动模式

设置方法

1
在AndroidManifest.xml中通过给<activity> 标签指定

standard 模式

每当启动一个新的活动,它就会在返回栈中入栈,并处于栈顶的位置。

standard模式的原理示意图

upload successful

singleTop 模式

在启动活动时如果发现返回栈的栈顶已经是该活动,则认为可以直接使用它,不会再创建新的活动实例

当所设定的活动并未处于栈顶位置时,这时再启动此活动,还是会创建新的实例的

upload successful

singleTask 模式

启动该活动时系统首先会在返回栈中检查是否存在该活动的实例,如果发现已经存在则直接使用该实例,并把在这个活动之上的所有活动统统出栈,如果没有发现就会创建一个新的活动实例

upload successful

singleInstance 模式

指定为singleInstance模式的活动会启用一个新的返回栈来管理这个活动

upload successful

有什么意义呢

想象以下场景,假设我们的程序中有一个活动允许其他程序调用,想实现其他程序和这个程序可以共享这个活动的实例。

前面3种启动模式肯定是做不到的,因为每个应用程序都会有自己的返回栈,同一个活动在不同的返回栈中入栈时必然是创建了新的实例。

而使用singleInstance模式就可以解决这个问题,在这种模式下会有一个单独的返回栈来管理这个活动,不管是哪个应用程序来访问这个活动,都共用的同一个返回栈,也就解决了共享活动实例的问题。

Build tools 32的问题

发表于 2022-02-23 | 分类于 笔记/安卓/

android studio 总是用最新的编译工具,而32版本的Build Tools中会出现问题。

默认编译情况会遇到Build tools 32 版本的问题。

upload successful

问题在于32版本开始d8文件,改为了dx。解决方法就是重命名。

Windows版本的解决方法:

1
2
3
4
5
进入C:\Users\你的用户名\AppData\Local\Android\Sdk\build-tools\32.0.0 目录
找到d8.bat的文件
复制---命名d8.bat为dx.bat。
进入C:\Users\你的用户名\AppData\Local\Android\Sdk\build-tools\32.0.0\lib目录
复制d8.jar,重名命名为dx.jar

Mac版的解决方法:

1
2
3
4
cd /sdk安装目录/Android/sdk/build-tools/32.0.0/
cp d8 dx
cd lib/
cp d8.jar dx.jar

android Google Index 问题

发表于 2022-02-22 | 更新于 2022-02-28 | 分类于 笔记/安卓/

app内build.gradle

lintOptions {
disable ‘GoogleAppIndexingWarning’
}

项目build.gradle

maven{ url ‘https://maven.aliyun.com/repository/public'}
maven { url ‘https://maven.aliyun.com/repository/jcenter' }
maven { url ‘https://maven.aliyun.com/repository/google'}
maven { url ‘https://maven.aliyun.com/repository/gradle-plugin'}

设置代理

http://mirrors.neusoft.edu.cn 端口:80

http://sdk.gdgshanghai.com 端口:8000

<i class="fa fa-angle-left" aria-label="上一页"></i>123…13<i class="fa fa-angle-right" aria-label="下一页"></i>
Space Yuan

Space Yuan

126 日志
26 分类
72 标签
RSS
<i class="fa fa-fw fa-github"></i>GitHub <i class="fa fa-fw fa-envelope"></i>E-Mail
© 2018 – 2022 Space Yuan