没事多喝水

技术笔记&记录生活点滴

  • 首页
  • 读书
  • 观影
  • 笔记
  • 读书笔记
  • Android学习
  • 生活
  • 吹口琴
  • 爱咖啡
  • IT技术-文档
  • 日常桌面
  • 数据库
  • CI/CD运维
  • Android开发
  • 小程序&微网页
  • Web开发
  • 产品
  • 教学
  • 安卓
  • 关于
  • 标签
  • 搜索

小程序scroll-view的滚动开发

发表于 2022-11-04 | 更新于 2022-11-05 | 分类于 IT技术-微信小程序

scroll-view例子

逻辑

数据: 一次读取的所有商品的列表(数量默认不目前不多,不用下拉载入)

设置滚动事件runScroll,

  1. 当滚动时,判断在所有id=currentNavi的对象中,当前所触动选项的位置信息。

  2. 如果位置高于>0,<120就将当前产品的分类设置为右侧分类选项的分类

实现代码

view部分

1
2
3
4
5
6
7
8
9
10
11
12
13
14
15
16
17
18
19
20
21
22
<scroll-view enhanced="true"  fast-deceleration="true" paging-enabled="true" scroll-y="true" class="left-view">
<view wx:for="{{navigobj}}" wx:key="id" class="{{navignum == item.cate_id? 'navig-list-active':''}} navig-list " data-id="{{item.cate_id}}" bindtap="selectNavig">{{item.cate_name}}</view>
</scroll-view>
<scroll-view id="goods_list" scroll-y="true" fast-deceleration="true" scroll-with-animation="true" binddragstart="dragScroll" scroll-y="true" class="weui-flex__item right-view" scroll-top="{{topNum}}" bindscrolltoupper="upperScroll" bindscrolltolower="lowerScroll" scroll-into-view="{{selGoodsID}}" bindscroll="runScroll">
<navigator wx:for="{{listobj}}" wx:key="index" id="goods_sort_{{index}}" url="../details/details?pid={{item.id}}" hover-class="none" class='weui-flex list-item currentNavi' data-catid="{{item.cat_id}}">
<view class='image-block'>
<image mode="aspectFill" src="{{staticUrl}}{{item.image}}"></image>
</view>
<view class="weui-flex__item content-block">
<view class="weui-flex__item">{{item.name}}</view>
<view class="weui-flex__item" wx:if="{{item.scale > 1}}" class="goods-price">抵扣{{item.scale}}份蔬菜</view>
<view wx:if="{{item.price > 0}}" class="goods-price">单价:{{item.price}}</view>
<view wx:if="{{sale_status == 2 || sale_status == 3}}" class="buy-block">
<image wx:if="{{item.num > 0}}" data-id="{{item.id}}" class="buy-left-butt" catchtap="leftButt" src="../../image/B01.png"></image>
<text wx:if="{{item.num > 0}}" class="buy-text-lable">{{item.num}}</text>
<image data-id="{{item.id}}" class="buy-right-butt" catchtap="rightButt" src="../../image/B02.png"></image>
</view>
<view wx:else class="goods-price">价格:{{item.price}}</view>

</view>
</navigator>
</scroll-view>

几个常用参数

  • enhanced
  • fast-deceleration 滑动减速速率控制,降低滑动速度,无精细化速度控制
  • paging-enabled 分页滑动效果
  • scroll-y 是否纵向滚动
  • id 选择器ID
  • scroll-top 设置竖向滚动条位置

常用事件

  • binddragstart 点击拖拽移动触发
  • bindscrolltoupper 移动到顶端触发
  • bindscrolltolower 移动到底部触发
  • scroll-into-view 一定到指定元素的位置触发
  • bindscroll 滚动时触发

js部分

1
2
3
4
5
6
7
8
9
10
11
12
13
14
15
16
17
runScroll:function(e){
// console.log(e);
let that =this;
wx.createSelectorQuery()
.in(this)
.selectAll('.currentNavi')
.boundingClientRect(function(rect){
// console.log(rect);
for (var cate = 0; cate < rect.length; cate++) {
if (rect[cate].top < 120 && rect[cate].top > 0) {
//设置当前选中的分类
that.setData({navignum:rect[cate].dataset.catid});
}
}
})
.exec();
}

小程序选择器

wx.createSelectorQuery 创建选择器
.in 作用在某个范围
.selectAll 选择元素
.boundingClientRect 获取选择元素的节点信息
mac 10.13.6 High Sierra 下编译PHP

发表于 2022-09-26 | 更新于 2022-09-30

brew 漫长的时间安装扩展包后,发现竟然不支持php7.4。直接打开brew下的php@7.4.rb的安装脚本进行获取其中的./configure配置,参考网上别人的配置文档,修改后,能兼容brew下的php7.4布局,手工编译也能灵活的设置配置编译模块。

具体步骤

1
2
3
#下载php7.4.30.tar.gz 
#解压缩至/private/tmp/目录下
cd /private/tmp/phpA7.4-20220924-61077-kvzxga/php-7.4.30

配置编译选项

7.4

1
2
3
4
5
6
7
8
9
10
11
12
13
14
15
16
17
18
19
20
21
22
23
24
25
26
27
28
29
30
31
32
33
34
35
36
37
38
39
40
41
42
43
44
45
46
47
48
49
50
51
52
53
54
55
56
57
58
59
60
61
62
63
64
65
66
67
68
69
70
71
72
#7.4

./configure --prefix=/usr/local/Cellar/php@7.4/7.4.30_1 \
--localstatedir=/usr/local/var \
--sysconfdir=/usr/local/etc/php/7.4 \
--with-config-file-path=/usr/local/etc/php/7.4 \
--with-config-file-scan-dir=/usr/local/etc/php/7.4/conf.d \
--with-pear=/usr/local/Cellar/php@7.4/7.4.30_1/share/php@7.4/pear \
--enable-bcmath \
--enable-calendar \
--enable-exif \
--enable-ftp \
--enable-fpm \
--enable-gd \
--with-mhash \
--enable-intl \
--enable-mbregex \
--enable-mbstring \
--enable-mysqlnd \
--enable-pcntl \
--enable-phpdbg \
--enable-phpdbg-readline \
--enable-phpdbg-webhelper \
--enable-maintainer-zts \
--enable-shmop \
--enable-soap \
--enable-sockets \
--enable-sysvmsg \
--enable-sysvsem \
--enable-sysvshm \
--with-apxs2=/usr/local/opt/httpd/bin/apxs \
--with-bz2=/usr/local/opt/bzip2 \
--with-curl \
--with-external-gd \
--with-external-pcre \
--with-ffi --with-fpm-user=_www \
--with-fpm-group=_www \
--with-gettext=/usr/local/opt/gettext \
--with-gmp=/usr/local/opt/gmp \
--with-iconv=/usr/local/opt/libiconv/ \
--with-kerberos \
--with-layout=GNU \
--enable-inline-optimization \
--with-ldap=/usr/local/opt/openldap \
--with-libxml --with-libedit --with-mhash=/usr \
--with-mysql-sock=/tmp/mysql.sock --with-mysqli=shared,mysqlnd \
--with-openssl=/usr/local/Cellar/openssl@1.1/1.1.1j\
--with-password-argon2=/usr/local/opt/argon2 \
--with-pdo-dblib=/usr/local/opt/freetds \
--with-pdo-mysql=shared,mysqlnd \
--with-pdo-odbc=unixODBC,/usr/local/opt/unixodbc \
--with-pdo-pgsql=/usr/local/opt/libpq \
--with-pdo-sqlite \
--with-pgsql=/usr/local/opt/libpq \
--with-pic \
--with-pspell=/usr/local/opt/aspell \
--with-sodium \
--with-sqlite3 \
--with-tidy=/usr/local/opt/tidy-html5 \
--with-unixODBC \
--with-xmlrpc \
--with-xsl \
--with-gettext \
--enable-session \
--with-zip \
--with-zlib \
--with-ffi \
--enable-soap \
--enable-opcache \
--enable-dtrace \
--with-gdbm=/usr/local/opt/gdbm \
--with-ldap-sasl

8.0

1
2
3
4
5
6
7
8
9
10
11
12
13
14
15
16
17
18
19
20
21
22
23
24
25
26
27
28
29
30
31
32
33
34
35
36
37
38
39
40
41
42
43
44
45
46
47
48
49
50
51
52
53
54
55
56
57
58
59
60
61
62
63
64
65
66
67
68
69
70
./configure --prefix=/usr/local/Cellar/php@8.0/8.0.23_1 \
--localstatedir=/usr/local/var \
--sysconfdir=/usr/local/etc/php/8.0 \
--with-config-file-path=/usr/local/etc/php/8.0 \
--with-config-file-scan-dir=/usr/local/etc/php/8.0/conf.d \
--with-pear=/usr/local/Cellar/php@8.0/8.0.23_1/share/php@8.0/pear \
--enable-bcmath \
--enable-calendar \
--enable-exif \
--enable-ftp \
--enable-fpm \
--enable-gd \
--with-mhash \
--enable-intl \
--enable-mbregex \
--enable-mbstring \
--enable-mysqlnd \
--enable-pcntl \
--enable-phpdbg \
--enable-phpdbg-readline \
--enable-phpdbg-webhelper \
--enable-maintainer-zts \
--enable-shmop \
--enable-soap \
--enable-sockets \
--enable-sysvmsg \
--enable-sysvsem \
--enable-sysvshm \
--with-apxs2=/usr/local/opt/httpd/bin/apxs \
--with-bz2=/usr/local/opt/bzip2 \
--with-curl \
--with-external-gd \
--with-external-pcre \
--with-ffi --with-fpm-user=_www \
--with-fpm-group=_www \
--with-gettext=/usr/local/opt/gettext \
--with-gmp=/usr/local/opt/gmp \
--with-iconv=/usr/local/opt/libiconv/ \
--with-kerberos \
--with-layout=GNU \
--enable-inline-optimization \
--with-ldap=/usr/local/opt/openldap \
--with-libxml --with-libedit --with-mhash=/usr \
--with-mysql-sock=/tmp/mysql.sock --with-mysqli=shared,mysqlnd \
--with-openssl=/usr/local/Cellar/openssl@1.1/1.1.1j\
--with-password-argon2=/usr/local/opt/argon2 \
--with-pdo-dblib=/usr/local/opt/freetds \
--with-pdo-mysql=shared,mysqlnd \
--with-pdo-odbc=unixODBC,/usr/local/opt/unixodbc \
--with-pdo-pgsql=/usr/local/opt/libpq \
--with-pdo-sqlite \
--with-pgsql=/usr/local/opt/libpq \
--with-pic \
--with-pspell=/usr/local/opt/aspell \
--with-sodium \
--with-sqlite3 \
--with-tidy=/usr/local/opt/tidy-html5 \
--with-unixODBC \
--with-xmlrpc \
--with-xsl \
--with-gettext \
--enable-session \
--with-zip \
--with-zlib \
--with-ffi \
--enable-soap \
--enable-opcache \
--enable-dtrace \
--with-gdbm=/usr/local/opt/gdbm \
--with-ldap-sasl

5.6

1
2
3
4
5
6
7
8
9
10
11
12
13
14
15
16
17
18
19
20
21
22
23
24
25
26
27
28
29
30
31
32
33
34
35
36
37
./configure --prefix=/usr/local/Cellar/php@5.6/5.6.40 \
--localstatedir=/usr/local/var \
--sysconfdir=/usr/local/etc/php/5.6 \
--with-config-file-path=/usr/local/etc/php/5.6 \
--with-config-file-scan-dir=/usr/local/etc/php/5.6/conf.d \
--with-pear=/usr/local/Cellar/php@5.6/5.6.40/share/php@5.6/pear \
--with-mysql \
--with-mcrypt \
--with-mysqli \
--with-pdo-mysql \
--with-mhash \
--with-curl \
--with-gd \
--with-zlib \
--with-openssl=/usr/local/Cellar/openssl@1.0/1.0.2q \
--with-mcrypt \
--with-xpm-dir=/usr/local/Cellar/libx11/1.8.1/include \
--with-gd=/usr/local/Cellar/gd/2.3.3_3 \
--with-freetype-dir=/usr/local/Cellar/freetype/2.10.1 \
--with-jpeg-dir=/usr/local/Cellar/jpeg-turbo/2.1.4 \
--with-png-dir=/usr/local/Cellar/libpng/1.6.37 \
--with-libxml-dir=/usr/local/Cellar/libxml2/2.10.2_1 \
--with-zlib-dir=/usr/local/Cellar/zlib/1.2.12_1 \
--with-iconv=/usr/local/Cellar/libiconv/1.17 \
--with-curl=/usr/local/Cellar/curl/7.73.0 \
--with-vpx-dir=/usr/local/Cellar/libvpx \
--enable-gd-native-ttf \
--enable-gd-jis-conv \
--enable-xml \
--enable-sockets \
--enable-simplexml \
--enable-pcntl \
--enable-soap \
--enable-sockets \
--enable-pdo \
--enable-cli \
--enable-fpm

编译配置选项说明

openssl

需要注意用brew安装,或者手工编译,这里指定了编译所需要的openssl的库地址

bzip2

需要安装bzip2

1
brew install bzip2

在配置中指定bzip2的类库

1
--with-bz2=/usr/local/opt/bzip2

libffi

安装

1
brew install libffi

在环境变量中增加libffi的库地址

1
2
3
export LDFLAGS="$LDFLAGS -L/usr/local/opt/libffi/lib"
export CPPFLAGS="$CPPFLAGS -I/usr/local/opt/libffi/include"
export PKG_CONFIG_PATH="/usr/local/opt/libffi/lib/pkgconfig:$PKG_CONFIG_PATH"

PKG_CONFIG_PATH 变量很重要,php7.4开始,很多扩展库的编译都需要通过此环境变量

icu4c

1
brew install icu4c

增加编译环境变量配置

1
2
3
4
export LDFLAGS="$LDFLAGS -L/usr/local/opt/icu4c/lib"
export CPPFLAGS="$CPPFLAGS -I/usr/local/opt/icu4c/include"
export PKG_CONFIG_PATH="/usr/local/opt/icu4c/lib/pkgconfig:$PKG_CONFIG_PATH"
export PATH="/usr/local/opt/icu4c/bin:$PATH"

sasl

1
2
3
4
5
6
brew install cyrus-sasl

export PATH="/usr/local/opt/cyrus-sasl/sbin:$PATH"
export LDFLAGS="$LDFLAGS -L/usr/local/opt/cyrus-sasl/lib"
export CPPFLAGS="$CPPFLAGS -I/usr/local/opt/cyrus-sasl/include"
export PKG_CONFIG_PATH="/usr/local/opt/cyrus-sasl/lib/pkgconfig:$PKG_CONFIG_PATH"

libxml2

1
2
3
4
5
brew install libxml2

export LDFLAGS="$LDFLAGS -L/usr/local/opt/libxml2/lib"
export CPPFLAGS="$CPPFLAGS -I/usr/local/opt/libxml2/include"
export PKG_CONFIG_PATH="/usr/local/opt/libxml2/lib/pkgconfig:$PKG_CONFIG_PATH"

编译安装

1
make -j2 && make install

配置

编译的配置中默认已经指定了配置文件的位置,配置中的这两句就定义

1
2
--with-config-file-path=/usr/local/etc/php/7.4 \
--with-config-file-scan-dir=/usr/local/etc/php/7.4/conf.d \

复制配置文件php-fpm、php.ini的配置文件

1
2
sudo cp /usr/local/etc/php/7.4/php-fpm.conf.default /usr/local/etc/php/7.4/php-fpm.conf
sudo cp /usr/local/etc/php/7.4/php-fpm.d/www.conf.default /usr/local/etc/php/7.4/php-fpm.d/www.conf

测试配置

1
/usr/local/opt/php@7.4/sbin/php-fpm --test

php.ini 中修改的配置

1
2
3
upload_max_filesize = 128M
post_max_size = 128M
date.timezone = PRC

启动

1
/usr/local/sbin/php74-fpm -D

最近产品做的事情

发表于 2022-09-10 | 分类于 产品

业务调研

  • 梳理现有业务流程
  • 与相关业务人员调研沟通
  • 核心需求整理分析&设计
    • 交付BRD文档
  • 制订各进度工作计划

总体方案设计

  • 核心业务流程设计(线下业务转换成平台端的线上业务流程)
  • 应用架构设计,平台应用架构与外部系统链接(飞书、企业微信、钉钉)
  • 功能子系统划分,各子系统所支持的业务流程,及所在业务板块
  • 功能模块功能设计
  • 功能模块演进&设定版本迭代功能次序
    • 交付PRD

细节方案设计

  • 业务所涉及对象建立模型

  • 数据埋点&报表设计

  • 权限设计

  • 设定角色与各功能子系统所涉及的流程

    • 交付原型
    • 各细节流程的流程图

项目管理&实施

  • 项目进度协调&把控
    • 每周定期沟通进度
      • 交付周报进度
    • 动态调整、更新、协调进度计划
  • 协助交付部署上线

Laravel .env 多环境配置文件

发表于 2022-08-28 | 分类于 IT技术-Web开发

修改 Nginx 配置文件设置 APP_ENV:

1
2
3
4
5
6
7
location ~ \.php$ {
fastcgi_pass 192.168.42.6:9000;
fastcgi_index index.php;
fastcgi_param SCRIPT_FILENAME $document_root$fastcgi_script_name;
include fastcgi_params;
fastcgi_param APP_ENV production;
}

对应laravel目录下.env.production

mac php安装

发表于 2022-07-04 | 分类于 IT技术-桌面/
1
2
3
4
5
6
7
8
9
10
11
12
13
14
15
16
17
18
19
20
21
22
23
24
25
26
27
28
29
30
31
32
33
34
35
36
37
38
39
40
41
42
43

~ brew search php #搜索php
==> Formulae
brew-php-switcher php@7.2 phplint pcp
php php@7.3 phpmd pup
php-code-sniffer php@7.4 phpmyadmin
php-cs-fixer php@8.0 phpstan
php-cs-fixer@2 phpbrew phpunit
➜ ~ brew install php@7.2 #安装php7.2


#配置文件路径
/usr/local/etc/php/7.2/php.ini
/usr/local/etc/php/7.2/php-fpm.ini
#重启服务
brew services restart php@7.2
#不在后台运行
/usr/local/opt/php@7.2/sbin/php-fpm --nodaemonize

➜ ~ vim /usr/local/etc/php/7.2/php-fpm.conf

#去掉第17行和第24行前面的分号
17 ;pid = run/php-fpm.pid #pid 文件就会自动产生在 /usr/local/var/run/php-fpm.pid
24 ;error_log = log/php-fpm.log


#测试php-fpm配置
php-fpm -t
php-fpm -c /usr/local/etc/php/7.2/php.ini -y /usr/local/etc/php/7.2/php-fpm.conf -t

#启动php-fpm
php-fpm -D
php-fpm -c /usr/local/etc/php/7.1/php.ini -y /usr/local/etc/php/7.1/php-fpm.conf -D

#关闭php-fpm
kill -INT `cat /usr/local/var/run/php-fpm.pid`

#重启php-fpm
kill -USR2 `cat /usr/local/var/run/php-fpm.pid`

#启动|停止|重启 PHP
brew services start|stop|restart php

mac brew 目录说明

发表于 2022-05-15 | 分类于 IT技术-桌面/

目录结构

1
2
3
4
5
6
7
8
9
10
11
12
13
14
#安装目录
/usr/local/Cellar/软件名称@版本号

#通过软连接,链接到对应版本的命令目录
/usr/local/bin/软件名

#切换命令,新版本已经去掉了switch命令,采用unlink,link的方式做切换

openssl从1.1切换到1.0
#删除链接
brew unlink openssl@1.1

#添加链接
brew link openssl@1.0

H5腾讯地图开发

发表于 2022-05-14 | 分类于 IT技术-Web开发 , 技术

前期设置

增加key

登陆腾讯lbs官网网站 微信登陆,注册一个key

地图经纬度换算

地图官方JS库添加

  • 载入地图js
    1
    <script charset="utf-8" src="https://map.qq.com/api/gljs?v=1.exp&key=注册的key"></script>

地图显示

基本地图设置

  • 地图显示部分
1
2
<!-- 地图部分 -->
<p id="container"></p>
  • 地图设置部分
1
2
3
4
5
6
7
8
9
//默认中心点经纬度
var lng = '经度';
var lat = '纬度';

var center = new TMap.LatLng(lng, lat);
var map = new TMap.Map("container", {
center: center,
zoom: 9 //地图放大数
});

标记显示

  • 多个标记
1
2
3
4
5
6
7
8
9
10
11
12
13
14
15
16
17
18
19
20
21
22
23
24
25
26
27
28
29
30
31
32
33
34
35
36
37
var marker = new TMap.MultiMarker({
id: 'marker-layer',
position: center,
map: map,

//标记点配置
styles: {
"marker": new TMap.MarkerStyle({
//标记宽度
"width": 25,
//标记高度
"height": 35,
//定位点相对坐标
"anchor": { x: 16, y: 32 },
//对齐方式
"direction": "top"
//标记图标自定义
// "src": 'https://mapapi.qq.com/web/lbs/javascriptGL/demo/img/markerDefault.png'
})
},

// 多个定位点
geometries: [
{
"id": 自定义id1,
"styleId": 'maker',
// 定位点经纬度
"position": new TMap.LatLng(lng, lat)
},
{
"id": 自定义id2,
"styleId": 'maker',
// 定位点经纬度
"position": new TMap.LatLng(lng, lat)
}
]
});
  • 多点文本标签(标记与文字标签只能二选一)

标签的问题就是无法支持完整的html结构,不能用css,只能用一些基本的文字样式设定

1
2
3
4
5
6
7
8
9
10
11
12
13
14
15
16
17
18
19
20
21
22
23
24
25
26
27
28
29
30
31
32
33
34
// 继承多点文本标签并做扩展
var label = new TMap.MultiLabel({
id: 'label-layer',
map: map,
styles: {
'label': labelColor('#000000')
},
// 多点标签
geometries:[
{
"id": "label_1",
'styleId': 'label',
"position": new TMap.LatLng(31.18667, 121.42894),
"content": "喜盈门店"
}
]
});

// 设定标记的样式
function labelColor(color) {
return new TMap.LabelStyle({
'color': color, //颜色属性
'size': 16, //文字大小属性
'offset': {
x: 0,
y: -70
}, //文字偏移属性单位为像素
'angle': 0, //文字旋转属性
'alignment': 'center', //文字水平对齐属性
'backgroundColor': 'rgba(255,255,255,255)',
'borderWidth': 1,
'verticalAlignment': 'middle' //文字垂直对齐属性
})
}
  • 自定义扩展文本标签,解决了原本标签无法设置html的方式,通过动态加入dom来解决
1
2
3
4
5
6
7
8
9
10
11
12
13
14
15
16
17
18
19
20
21
22
23
24
25
26
27
28
29
30
31
32
33
34
35
36
37
38
39
40
41
42
43
44
45
46
47
48
49
50
51
52
53
54
55
56
57
58
59
60
61
62
63
64
65
66
67
68
69
70
71
72
73
74
75
76
77
78
79
80
81
82
83
84
class LabelCluster extends TMap.DOMOverlay {
constructor (options) {
super(options)
// 移动端touchmove事件执行时需禁止触发touchend
this.enableClick = true
}

onInit (options) {
this.content = options.content
this.position = options.position
}

// 销毁时需要删除监听器
onDestroy () {
this.dom.removeEventListener('click', this.onClick)
this.dom.removeEventListener('touchend', this.onTouchEnd)
this.dom.removeEventListener('touchmove', this.onTouchMove)
this.removeAllListeners()
}

// 点击事件
onClick (e) {
this.emit('click', e)
}

// 移动端触摸结束事件
onTouchEnd (e) {
// 移动端的触摸移动后禁止触发touchend事件
if (!this.enableClick) {
this.enableClick = true
return
}
this.emit('touchend', e)
}

// 移动端触摸移动事件
onTouchMove (e) {
// 移动端的触摸移动后禁止触发touchend事件
this.enableClick = false
this.emit('touchmove', e)
}

// 创建气泡DOM元素
createDOM () {
var dom = document.createElement('div')
// 设置DOM样式
dom.style.cssText = 'max-height:135px;max-width:440px;padding:15px;background:#fff;border:#ccc solid 1px;font-weight:bold;line-height:30px;font-size:15px;'
dom.innerHTML = this.content;

// 监听点击事件,实现zoomOnClick
this.onClick = this.onClick.bind(this)
this.onTouchEnd = this.onTouchEnd.bind(this)
this.onTouchMove = this.onTouchMove.bind(this)
// pc端注册click事件,移动端注册touchend事件
dom.addEventListener('click', this.onClick)
dom.addEventListener('touchend', this.onTouchEnd)
dom.addEventListener('touchmove', this.onTouchMove)
return dom
}

// 更新
updateDOM () {
if (!this.map) {
return
}
// 经纬度坐标转容器像素坐标
const pixel = this.map.projectToContainer(this.position)

// 使文本框中心点对齐经纬度坐标点
const left = pixel.getX() - this.dom.clientWidth / 2 + 'px'
const top = pixel.getY() - this.dom.clientHeight / 2 + 'px'
this.dom.style.transform = `translate(${left}, ${top})`

this.emit('dom_updated')
}
}

var label = new LabelCluster({
map: map,
// 设置信息框位置
position: center,
// 设置信息框内容
content: '<div style=padding-top:5px;>重庆园博园店</div><div></div><div>ww</div>'
});

信息窗口

1
2
3
4
5
6
7
8
9
10
11
12
13
14
15
16
17
18
19
var infoWindow  = new TMap.InfoWindow({
map: map,
//是否使用自定义地址(默认为false)
enableCustom: true,
position: new TMap.LatLng(lng, lat),
content: cusInfoWindow('显示标题','显示地址')
});

// 信息框内容生成函数
function cusInfoWindow(title,address){
let html = '<div '
+ 'class=info_card'
+ '>'
+ '<div class=marker_title onclick=show()>'+ title + '</div>'
// + '<div>'+ address + '</div>'
+ '<span class="cancle bot">11</span><span class="cancle top"></span>'
+'</div>';
return html;
}

PHP游览器判定

发表于 2022-05-08 | 分类于 IT技术/Web开发

php判断游览器函数

1
2
3
4
5
6
7
8
9
10
11
12
13
14
15
16
17
18
19
20
21
22
23
24
25
26
27
28
29
30
31
32
33
34
35
36
37
38
39
40
41
42
43
44
45
46
47
48
49
50
51
52
53
54
55
56
57
58
59
60
61
62
63
64
65
66
67
68
69
70
71
72
73
74
75
76
77
function getBrowerInfo()
{
$u_agent = $_SERVER['HTTP_USER_AGENT'];
$bname = 'Unknown';
$platform = 'Unknown';
$version = "";

//First get the platform?
if (preg_match('/linux/i', $u_agent)) {
$platform = 'linux';
} elseif (preg_match('/macintosh|mac os x/i', $u_agent)) {
$platform = 'mac';
} elseif (preg_match('/windows|win32/i', $u_agent)) {
$platform = 'windows';
}

// Next get the name of the useragent yes seperately and for good reason
if (preg_match('/MSIE/i', $u_agent) && !preg_match('/Opera/i', $u_agent)) {
$bname = 'Internet Explorer';
$ub = "MSIE";
} elseif (preg_match('/Firefox/i', $u_agent)) {
$bname = 'Mozilla Firefox';
$ub = "Firefox";
} elseif (preg_match('/OPR/i', $u_agent)) {
$bname = 'Opera';
$ub = "Opera";
} elseif (preg_match('/Chrome/i', $u_agent) && !preg_match('/Edge/i', $u_agent)) {
$bname = 'Google Chrome';
$ub = "Chrome";
} elseif (preg_match('/Safari/i', $u_agent) && !preg_match('/Edge/i', $u_agent)) {
$bname = 'Apple Safari';
$ub = "Safari";
} elseif (preg_match('/Netscape/i', $u_agent)) {
$bname = 'Netscape';
$ub = "Netscape";
} elseif (preg_match('/Edge/i', $u_agent)) {
$bname = 'Edge';
$ub = "Edge";
} elseif (preg_match('/Trident/i', $u_agent)) {
$bname = 'Internet Explorer';
$ub = "MSIE";
}

// finally get the correct version number
$known = array('Version', $ub, 'other');
$pattern = '#(?<browser>' . join('|', $known) .
')[/ ]+(?<version>[0-9.|a-zA-Z.]*)#';
if (!preg_match_all($pattern, $u_agent, $matches)) {
// we have no matching number just continue
}
// see how many we have
$i = count($matches['browser']);
if ($i != 1) {
//we will have two since we are not using 'other' argument yet
//see if version is before or after the name
if (strripos($u_agent, "Version") < strripos($u_agent, $ub)) {
$version = $matches['version'][0];
} else {
$version = $matches['version'][1];
}
} else {
$version = $matches['version'][0];
}

// check if we have a number
if ($version == null || $version == "") {$version = "?";}

return array(
'userAgent' => $u_agent,
'name' => $bname,
'version' => $version,
'platform' => $platform,
'pattern' => $pattern,
);
}

$browser = getBrowerInfo();

webp图片生成

发表于 2022-05-08 | 更新于 2022-05-17 | 分类于 IT技术/Web开发

ubuntu系统安装cwebp支持

1
apt-get install libmagickwand-dev libmagickcore-dev webp -y

使用 webp-tools 实现 webp与png、jpg 之间的格式转换

  • cwebp → WebP encoder tool
  • dwebp → WebP decoder tool
  • vwebp → WebP file viewer
  • webpmux → WebP muxing tool
  • gif2webp → Tool for converting GIF images to WebP
1
2
3
4
5
# convert from webp to png
dwebp mycat.jpg -o mycat.png

# Convert from JPG to WebP
cwebp some.jpg -o target.webp

cwebp 常用参数

1
2
3
4
5
6
7
8
9
10
11
12
13
14
15
16
17
18
19
20
21
22
23
24
25
26
27
28
29
30
31
32
33
34
35
36
37
38
39
40
41
42
43
-h, -help :显示帮助信息(简单版)。
-H, -longhelp :显示帮助信息(详细版)。
-q <float> :品质参数(0:最小,100:最优),缺省值为 75。
-alpha_q <int> :为 alpha 压缩指定一个 0 到 100 的数值。alpha 无损压缩用 100,小于 100 将产生有损压缩。默认值100。
-preset <string> :指定一组预定义的值用来区分不同的文件材料。可能的值有 default、photo、picture、drawing、icon、text。由于 -preset 覆盖其他参数的值(除了 -q),这个值最好出现在所有参数最前面。
-z <int> :切换无损压缩模式级别从 0 到 9,0 最快,9 最慢。速度越快文件越大。比较好的默认值是 6。这个参数是一个预定义压缩质量快捷阐述。如果参数 -q 或者 -m 被随后用到,这个 -z 就无效了。
-m <int> :制定压缩模式。这个参数控制了编码的速度,压缩文件大小,质量。值范围为 0 到 6,默认 4。值越大,花费时间越大用来检查额外的编码能力和质量。小的值会产生快的压缩速度,大的文件和低的压缩质量。
-segments <int> :更改在 sns 算法分段期间要使用的分区数。段的范围应为 1 到 4,默认值为 4。除非使用 -low_memory,否则此选项对方法 3 及更高版本无效。
-size <int> :为输出文件指定一个目标大小(单位 bytes),压缩器将多次压缩以接近这个目标。如果 -size 和 -psnr 同时使用, 那么 -size 优先。
-psnr <float> :指定目标 PSNR(以 dB 为单位)以尝试达到压缩输出。 压缩程序将通过几次部分编码,以便尽可能接近此目标。 如果同时使用 -size 和 -psnr,则以 -size 值为准。
-s <int> <int> :YUV 的输入大小(宽 x 高)。
-sns <int> :指定空间噪声整形的幅度(0:off,100:最大),缺省值为 50。
-f <int> :指定解过滤器的强度(0:off,100:最大),缺省值为 60。
-sharpness <int> :指定过滤的清晰度(0:最清晰,7:最不清晰),缺省值为 0。
-strong :使用强过滤替代简单过滤(默认开启强过滤)。
-nostrong :禁用强过滤,使用简单过滤。
-sharp_yuv :如果需要,请使用更准确,更清晰的 RGB-> YUV 转换。 请注意,此过程比默认的“快速” RGB-> YUV 转换要慢。
-partition_limit <int> :限制质量以适应第一个分区的 512k 限制(0:无降级,100:完全降级),缺省值为 0。
-pass <int> :设置选项 -size 或 -psnr 程序执行期间要使用的最大通过次数。参数范围 1 到 10,默认值为 1。如果使用选项 -size 或 -psnr,但未指定 -pass,则将使用默认值 6。
-crop <x> <y> <w> <h> :从左边顶部的点开始 (x_position, y_position) 计算来裁切图片。裁切区域必须在原文件图片区域内。
-resize <w> <h> :调整源文件的宽高。如果任意一个宽或者高的参数为 0,那么将按比例计算。
-mt :如果支持,采用多线程编码。
-low_memory :通过节省四倍于压缩大小(通常)来减少有损编码的内存使用。 这将使编码变慢,并且输出的大小和失真会稍有不同。
-map <int> :输出额外的 ASCII 映射编码信息。 可能的映射值范围是1到6。这仅是为了帮助调试。
-print_psnr :计算并报告平均 PSNR(峰值信噪比)。
-print_ssim :计算并报告平均 SSIM(结构相似性指标)。
-print_lsim :计算并报告局部相似性度量(像素邻居中的最低误差之和)。
-d <file.pgm> :转储压缩的输出(PGM 文件)。
-alpha_method <int> :指定用于 alpha 压缩的算法:0 或 1。算法 0 表示无压缩,1 使用 WebP 无损格式进行压缩。 预设值为 1。
-alpha_filter <string> :指定 Alpha 平面的预测过滤方法。有效值:none、fast、best,默认为 fast。
-exact :将 RGB 值保留在透明区域中。默认为关闭,以帮助压缩。
-blend_alpha <hex> :将颜色与以十六进制写入的 RGB 值表示的背景颜色混合,例如 0xc0e0d0 代表红色=0xc0,绿色=0xe0,蓝色=0xd0。
-noalpha :使用此选项将丢弃 Alpha 通道。
-lossless :无损编码图片处理。意味着整个图片,包含透明区域、看不见的像素值(R/G/B 或 Y/U/V)都会被保存。
-near_lossless <int> :指定无损压缩级别对图片处理预处理(0..100=off),缺省值为 100。这个参数用来调整像素帮助图片的可压缩性,但是尽可能减少图片可见区域质量。
-hint <string> :指定有关输入图像类型的提示。可能的值为:photo、picture 或 graph。
-metadata <string> :逗号分隔的元数据列表,如果存在,则从输入复制到输出。有效值:all、none、exif、icc、xmp。默认为 none。
-short :仅出于测试目的打印简要信息(输出文件大小和 PSNR)。
-quiet :安静模式(不打印任何东西)。
-version :打印版本信息并退出。
-noasm :禁用所有装配优化。
-v :打印更多信息(特别是编码时间)。
-progress :报告编码进度(百分比)。

对当前目录下的图片jpg、png转换成webp

1
for F in *.jpg; do cwebp -q 100 -preset photo $F -o `basename ${F%.jpg}`.webp; done

php对webp的支持配置

常用2种支持,gd和imagick

用docker方式和普通环境下都是一样的

gd库配置支持,需要单独编译

1
2
3
4
5
6
7
8
9
10
11
12
13
14
15
16
17
18
19
20
21
22
23
24
25
26
27
28
29
30
31
32
33
# 安装环境支持 
apt-get install -y libfreetype6-dev \
libjpeg62-turbo-dev \
libpng-dev \
libxpm-dev \
libwebp-dev \

#docker下安装扩展
#php5docker下gd库配置
docker-php-ext-configure gd \
--with-freetype-dir=/usr/include/ \
--with-jpeg-dir=/usr/include/ \
--with-xpm-dir=/usr/include/ \
--with-webp-dir=/usr/include/

docker-php-ext-install gd

#单一环境下安装
cd php-5.6.x/ext/gd
phpize
./configure --with-webp-dir=/usr/include/ \
--with-freetype-dir=/usr/include/ \
--with-jpeg-dir=/usr/include/ \
--with-png-dir=/usr/include/ \
--with-xpm-dir=/usr/include/

make

#添加扩展模块.ini
echo extension=gd.so > /usr/local/etc/php/docker-php-ext-gd.ini

#查看gd是否支持webp
php --ri gd

imagick扩展支持webp

1
2
3
4
5
6
7
8
9
10
11
12
13
14
15
16
17
18
19
20
21
22
23
24
25
26
27
28
29
30
31

# 系统源码安装imagick,系统自带不支持

# 下载老一些版本,保证稳定性
wget --no-check-certificate https://download.imagemagick.org/ImageMagick/download/releases/ImageMagick-6.9.12-49.tar.gz
tar zxvf ImageMagick-6.9.12-49.tar.gz
cd ImageMagick-6.9.12-49

#安装在/usr/local目录下,并开启webp支持
./configure --prefix=/usr/local --with-webp=yes
make && make install

#更新.so支持库
ldconfig /usr/local/lib

#查询编译的Imagick是否只是webp
convert -list format | grep webp

pecl channel-update pecl.php.net
pecl install imagick

#指定安装目录/usr/local

echo extension=imagick.so > /usr/local/etc/php/docker-php-ext-imagick.ini


#查看imagick支持
php --ri imagick |grep WEBP

#通过phpinfo查询
echo '<?php phpinfo(); ?>' | php 2>&1 |grep -i ssl

php代码中实现webp转换(imagick版本)

1
2
3
4
5
6
7
8
9
10
11
12
13
14
15
16
17
18
19
20
21
22
23
24
25
26
27
28
29
30
31
32
33
/**
* Makes a webp.
*
* @param <type> $photo The photo
* @param string $width The width
* @param string $height The height
* @param string $quality The quality
*/
public function makeWebp($photo, $width = '', $height = '', $quality = '99')
{
$img_info = $this->getImgInfo($photo);
$photo = $this->images_dir . $photo; // 获得图片源
$webp_name = substr($img_info["name"], 0, strrpos($img_info["name"], ".")) . "." . "webp"; // 缩略图名称

if ($img_info["type"] == 1) {
$img = imagecreatefromgif($photo);
} elseif ($img_info["type"] == 2) {
$img = imagecreatefromjpeg($photo);
} elseif ($img_info["type"] == 3) {
$img = imagecreatefrompng($photo);
} else {
$img = "";
}

$thumb = new \Imagick();
$thumb->readImage($photo);
$thumb->setImageFormat("webp");
//设置地图质量
$thumb->setImageCompressionQuality($quality);
$thumb->writeImage($this->images_dir . $webp_name);
$thumb->clear();
$thumb->destroy();
}

七牛云cdn配置

发表于 2022-05-04 | 分类于 IT技术/运维

结构

web管理后台 -> 测试站/正式站 -> inotify -> rsync -> dst源 -> cdn

测试站和正式站在不同服务器,如部署在正式站,则采用

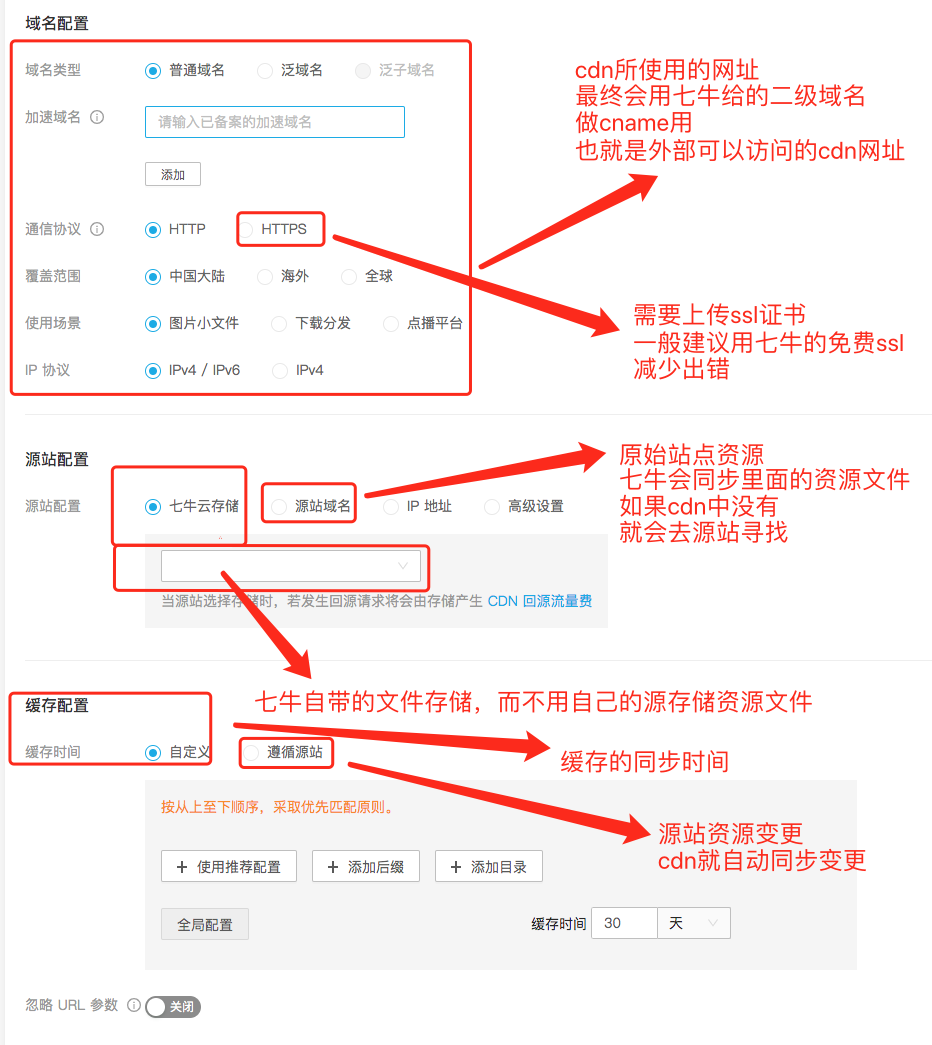
域名设置

upload successful

配置inotify

运行网站主机,上传文件后,自动同步至cdn的源网站的资源文件夹目录

1
2
3
4
5
6
7
8
9
10
11
12
13
14
15
#!/bin/bash
#远程主机ip
host=x.x.x.x
#当前源目录
src=/www/dev/xxx
#目标目录
dst_module=/www/xxx
#远程用户
user=rsync

/usr/bin/inotifywait -mrq --timefmt '%d/%m/%y %H:%M' --format '%T %w %f' -e modify,delete,create,attrib ${src} |while read file
do
/usr/bin/rsync -ve -t -r -D --compress-level=8 --rsh=ssh --progress --stats ${src} ${user}@${host}:${dst_module}
echo "${file} was rsyncd" >> /var/log/rsyncd.log 2>&1
done

–compress-level 压缩等级

用screen后端运行

1
sh rsync_inotify.sh
12…13<i class="fa fa-angle-right" aria-label="下一页"></i>
Space Yuan

Space Yuan

126 日志
26 分类
72 标签
RSS
<i class="fa fa-fw fa-github"></i>GitHub <i class="fa fa-fw fa-envelope"></i>E-Mail
© 2018 – 2022 Space Yuan